


OpenGl Setup Guide
Introduction
This article guides you in creating a foundational setup for OpenGL projects using SDL2, Glad, CMake, and Git. This versatile template is beneficial for various purposes, including following OpenGL tutorials, crafting your own games, or preparing for upcoming tutorial series.
By following the outlined steps, you'll establish an OpenGL project framework that compiles smoothly, supports future expansions, and fosters collaboration. The template's modular design simplifies the integration of graphics and input handling, allowing you to explore OpenGL's capabilities and create captivating interactive experiences.
Beyond individual projects, this setup serves as a consistent foundation for your tutorials, games, and more. Its standardized structure streamlines sharing and understanding your work, enabling others to engage with your code effortlessly.
In the upcoming sections, we'll delve into the specifics of integrating SDL2 and Glad, configuring CMake builds, and utilizing Git for version control. By the end, you'll possess the knowledge to construct a cpp reusable OpenGL project template that enhances your creative projects and facilitates your exploration of graphics programming.
Table of Contents
- Introduction
- Setting up SDL2 with Git
- Generating Glad Files
- Integrating SDL2 and Glad with CMake
- Setting up the Project Structure
- Conclusion
Project Structure
Before diving into the setup, it's essential to understand the project's structure. Here's how we'll organize our files and directories:
mkdir Tests Includes Sources Resourses Vendor
tree
.
├── Includes
├── Resourses
├── Sources
└── Vendor
└── Tests

5 directories, 0 files
Sources: This is where your main application code and cpp files (likemain.cpp) will reside.Includes: If you have any custom header files, they will be placed here.Resources: For any additional resources like images, shaders, etc.Vendor: This directory will contain third-party libraries, including SDL2 and Glad.Tests: This directory contains all the tests/*.cpp
Setting up SDL2 with Git
- Initialize a Git Repository: Lets initialize a Git repository in our project directory, do so with the following command:
git init
Add the next content to the .gitignore file
touch .gitignore
# Exclude build and example foders
[Bb]in
[Bb]uild/
[Bb]uild-tests
[Bb]in-tests
[Ee]xamples

#Exclude all the cpp files
[Tt]ests/*.cpp

#Include only the example of this folder
!Tests/.gitignore
!Tests/Test_sdl.cpp

compile_commands.json
git add .
git commit -m "initial commit"
- Add SDL2 as a submodule:
This will fetch the SDL2 library and place it in the
Vendor/SDLdirectory.
git submodule add https://github.com/libsdl-org/SDL.git Vendor/SDL
- Update and Initialize the Submodule: This ensures the submodule content is fetched and updated.
git submodule update --init
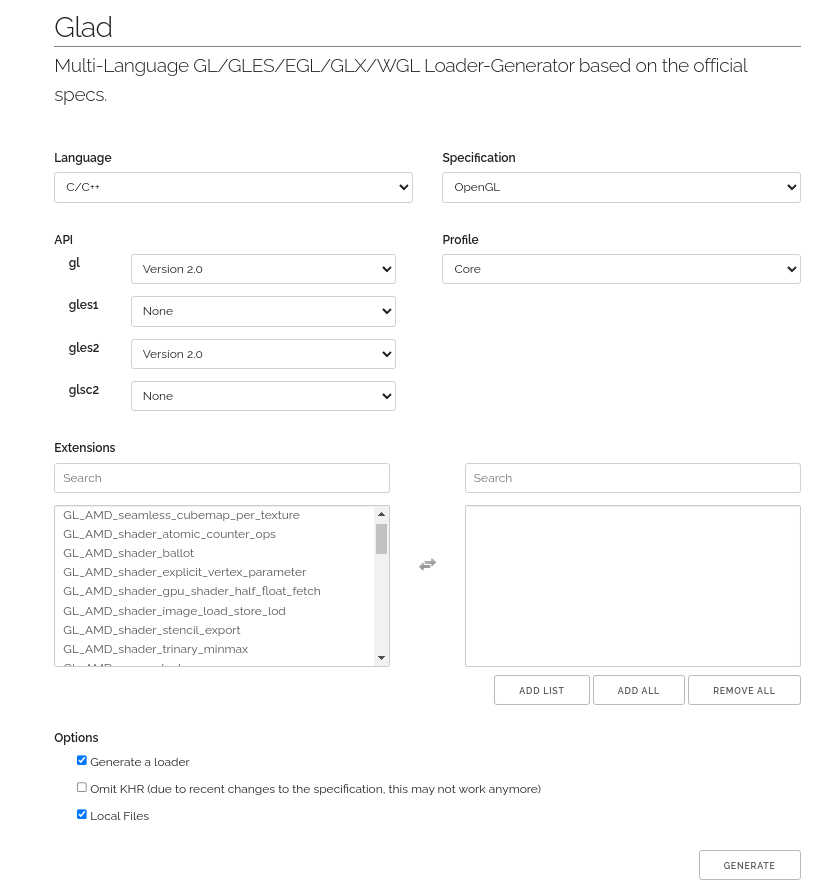
Generating Glad Files
-
Visit the Glad Web Service: Open your web browser and navigate to Glad's web service.
-
Select the API:
- For desktop applications, choose
GL. For mobile applications, Webgl chooseGLES2. For this example we will choose GLES2.
- For desktop applications, choose
-
Profile:
- Choose the Core profile. This provides a modern approach to OpenGL without deprecated features.
-
Options:
- Ensure Generate a loader is checked. This provides a function to load OpenGL functions at runtime.
- Leave Omit KHR unchecked.
- Check Local Files to ensure you can build offline.
-
Extensions:
- If you're unsure about extensions, leave this section as is. You can always come back and regenerate the files if needed later.
-
Generate and Download:
- Click the "Generate" button.
- Download the zip file and extract its contents.
- Place the
*.hfiles intoVendor/Glad/include/glad/and theglad.cfile intoVendor/Glad/srcin your project. - Open Vendor/Glad/src/glad.c and update the first #include "glad.h" to #include <glad/glad.h>. We make this change to mirror the system-wide installation. This way, if we decide to install it system-wide later on, we won't have to update our includes.
- CMakeLists.txt: In the root of your project, create those two files, name them
CMakeLists.txtandinstall.sh. The CMakeLists.txt will instruct CMake on how to build our project.
First allow the install script to execute by chmod +x install.sh and then open the file and add the next content
chmod +x install.sh
#install.sh
#!/bin/bash
PROJECT_DIR="$( cd "$( dirname "${BASH_SOURCE[0]}" )" && pwd )"
SDL_RELEASE="release-2.28.3"
BUILD_TEST_DIR="Build-tests"
BUILD_DIR="Build"
SDL2_INCLUDES_PATH="${PROJECT_DIR}/Includes/SDL2"
SDL_DIR="${PROJECT_DIR}/Vendor/SDL"

function copy_sdl_include()
{
    if [[ ! -L "${SDL2_INCLUDES_PATH}" && ! -d "${SDL2_INCLUDES_PATH}" ]]; then
        mkdir "${SDL2_INCLUDES_PATH}"
    fi
    cd ${SDL_DIR}/include
    for file in *; do
        if [[ ! -e "${SDL2_INCLUDES_PATH}/$file" ]]; then
            ln -s "$(pwd)/$file" "${SDL2_INCLUDES_PATH}"
        fi
    done
    exit 0
}


function delete_sdl_include()
{
    if [[ -d "${SDL2_INCLUDES_PATH}" ]]; then
        cd ${PROJECT_DIR}
        rm -rf "${SDL2_INCLUDES_PATH}"
    fi
    exit 0
}

function fetch_sdl()
{
    cd $SDL_DIR
    git checkout ${SDL_RELEASE}
    git fetch
    cd - > /dev/null
}

function clean_all()
{
    # Remove build directory if it exists
    if [[ -d "${BUILD_DIR}" ]]; then
        rm -rf ${BUILD_DIR}
    fi
    # Remove build-tests directory if it exists
    if [[ -d "${BUILD_TEST_DIR}" ]]; then
        rm -rf ${BUILD_TEST_DIR}
    fi
    delete_sdl_include
}

# Check for --tests flag
if [[ "$1" == "--tests" ]]; then
    # Create build-tests directory if it doesn't exist

    if [[ ! -d "${BUILD_TEST_DIR}" ]]; then
        mkdir ${BUILD_TEST_DIR}
    fi

    fetch_sdl
    # Change to build-tests directory
    cd ${BUILD_TEST_DIR}

    # Run cmake with BUILD_TESTS flag
    cmake -DBUILD_TESTS=ON ..
    make
    copy_sdl_include

    exit 0

elif [[ "$1" == "--clean-all" ]]; then
    clean_all
    exit 0

else
    if [[ ! -d "${BUILD_DIR}" ]]; then
        mkdir ${BUILD_DIR}
    fi
    fetch_sdl
    cd ${BUILD_DIR}
    cmake ..
    make
    copy_sdl_include
    exit 0

fi
This script creates a new build directory, navigates into it, and then runs cmake .. Additionally, it provides flags to clean all output and build directories. It also establishes a link between Vendor/SDL/include and Includes/SDL2 to maintain backward compatibility with the system-wide installation. This ensures that if we ever decide to install this system-wide, we won't need to modify the source files. Specifically, when we include this header, it will be in the format <SDL2/SDL.h>. By default, when cloning a repository with submodules, it fetches the latest version of the submodule. However, for compatibility or other reasons, we might prefer a specific version or branch of SDL. The fetch_sdl function automates the process of switching to the desired branch version.
Next, we'll construct the script for building the project. This is the core of the project where we instruct CMake on how to compile our final binary. I've left comments in the final source code for those interested in learning more about the CMake script
Add the following to the CMakeLists.txt
cmake_minimum_required(VERSION 3.10)
#project name
project(SDL_Glad_Template)
#compiler options
set(CC "c++14")
set(CMAKE_CXX_FLAGS "${CMAKE_CXX_FLAGS} -Wall -Wextra -Wpedantic -std=${CC}")

#execuatable names
set(EXEC_TESTS "SdlTests")
set(EXEC_MAIN "SdlOpengl")


#variables to the different projects
set(VENDOR_SOURCE_SDL ${CMAKE_SOURCE_DIR}/Vendor/SDL)
set(VENDOR_SOURCE_GOOGLETEST ${CMAKE_SOURCE_DIR}/Vendor/googletest)
set(VENDOR_SOURCE_GLAD ${CMAKE_SOURCE_DIR}/Vendor/glad)
set(PROJECT_SOURCES ${CMAKE_SOURCE_DIR}/Sources)
set(PROJECT_TESTS ${CMAKE_SOURCE_DIR}/Tests)

#headers to the libraries we are using and our own include folder
set(HEADERS
    ${CMAKE_SOURCE_DIR}/Includes
    ${CMAKE_SOURCE_DIR}/Includes/SDL2
    ${VENDOR_SOURCE_GLAD}/include
)

#Turn off some SDL options
option(SDL_DISABLE_INSTALL  ON)
option(SDL_DISABLE_INSTALL_DOCS ON)
option(SDL_DISABLE_UNINSTALL ON)
option(SDL_DISABLE_INSTALL_CPACK ON)
option(SDL_TEST_LIBRARY OFF)
add_subdirectory(${VENDOR_SOURCE_SDL})

#boolean variable to tell to this cmake file to build or not the
#tests.
option(BUILD_TESTS "Build the tests" OFF)

if(BUILD_TESTS)
    option(INSTALL_GTEST OFF)
    add_subdirectory(${VENDOR_SOURCE_GOOGLETEST})
    add_subdirectory(${PROJECT_TESTS})
else()
    add_subdirectory(${PROJECT_SOURCES})
endif()
The script defines how to build the dependency libraries we use. When building these dependencies, we instruct CMake not to install them system-wide since we're linking them directly to our binary. To speed the compilation process, we've turned off some options from the vendor libraries using the option(NAME_OPTION BOOL) command. For more available options, you can refer to the vendor library's project documentation. We direct CMake on how to build the projects by providing the full path to add_subdirectory then cmake will do its magic by looking for the cmake file inside that directory. Our project is divided into two submodules: Sources and Tests, each with its own CMakeLists.txt that outlines how to generate the final output.
We set a variable to hold all the headers we need. Here, CMAKE_SOURCE_DIR refers to the current root project, and we assemble the path to the include directories. Since Glad doesn't come with a CMake file, we simply set the path to the src folder and link it against our final binary.
After adding lots of files, we need to stage these changes using git add before committing them to the repository.
git add .
git commit -m "added Vendors"
2. CMakeLists.txt submodules: For the next step, we will create two CMakeLists.txt files: one inside the Tests folder and another in the Sources folder. Let's start by opening Tests/CMakeLists.txt
#Tests/CMakeLists.txt
set(BIN_TESTS "bin")
file(GLOB TEST_SOURCES "*.cpp")

#Adding glad.c to TEST_SOURCE
set(TEST_SOURCES
    ${TEST_SOURCES}
    ${VENDOR_SOURCE_GLAD}/src/glad.c)

#message("EXEC_TESTS: ${EXEC_TESTS}")
#message("VENDOR_SOURCE_GOOGLETEST: ${VENDOR_SOURCE_GOOGLETEST}")
#message("HEADERS: ${HEADERS}")

add_executable(${EXEC_TESTS} ${TEST_SOURCES})

target_include_directories(${EXEC_TESTS} PRIVATE   ${VENDOR_SOURCE_GOOGLETEST}
    ${HEADERS}
    )
target_link_libraries(${EXEC_TESTS} SDL2main SDL2 gtest gtest_main)

set_target_properties(${EXEC_TESTS} PROPERTIES RUNTIME_OUTPUT_DIRECTORY ${CMAKE_BINARY_DIR}/${BIN_TESTS})
In essence, this script segment sets up the building and linking of a test executable using source files from the current directory, linking against SDL2 and Google Test, and placing the resulting executable in a bin directory. Note that we haven't cloned the googletest repository yet; that will be an exercise for the reader.
I will leave, the Sources/CMakeLists.txt empty as an exercise. It's nearly identical to the cmake script for the test binary. You'll need to add the executable target, set the include directories, target the link libraries SDL2main SDL2 (excluding the Google Test libraries), and finally output the binary to the bin folder. If you get lost, you can refer to the GitHub repo to see the final output.
Setting Up the Project Structure
Add the next files.
├── Includes/
│   └── common.hpp
│
└── Sources/
    └── main.cpp
- Setting Up the common.hpp Header:
In the Includes/common.hpp file, include the necessary headers for SDL2 and Glad:
 // Includes/common.hpp
// SDL2 Headers
#include <SDL2/SDL.h>

// Glad Headers for OpenGL
#include <glad/glad.h>
- Setting Up the main.cpp Source File:
In the Sources/main.cpp file, write a basic program to initialize SDL2 and create an OpenGL ES 2.0 context:
 // Sources/main.cpp

#include "common.hpp"

int main(int argc, char* argv[]) {
    // Initialize SDL
    if (SDL_Init(SDL_INIT_VIDEO) != 0) {
        SDL_Log("Unable to initialize SDL: %s", SDL_GetError());
        return 1;
    }

    // Create an SDL window
    SDL_Window* window = SDL_CreateWindow("OpenGL ES 2.0 with SDL2 and Glad",
                                          SDL_WINDOWPOS_CENTERED, SDL_WINDOWPOS_CENTERED,
                                          800, 600,
                                          SDL_WINDOW_OPENGL | SDL_WINDOW_SHOWN);
    if (!window) {
        SDL_Log("Could not create window: %s", SDL_GetError());
        SDL_Quit();
        return 1;
    }

    // Create an OpenGL context associated with the window
    SDL_GLContext gl_context = SDL_GL_CreateContext(window);

    // Load OpenGL ES 2.0 functions using Glad
    gladLoadGLES2Loader((GLADloadproc)SDL_GL_GetProcAddress);

    // Main loop (for demonstration purposes, it just clears the screen with a color)
    bool running = true;
    while (running) {
        SDL_Event event;
        while (SDL_PollEvent(&event)) {
            if (event.type == SDL_QUIT) {
                running = false;
            }
        }

        // Clear the screen
        glClearColor(0.1f, 0.1f, 0.1f, 1.0f);
        glClear(GL_COLOR_BUFFER_BIT);

        // Swap the window buffers
        SDL_GL_SwapWindow(window);
    }

    // Clean up
    SDL_GL_DeleteContext(gl_context);
    SDL_DestroyWindow(window);
    SDL_Quit();

    return 0;
}
Summary: This code initializes SDL2 and creates a window with an OpenGL ES 2.0 context. It then enters a loop where it continuously clears the screen with a dark gray color until the window is closed by the user.
Conclusion
After setting up the necessary files and configurations, execute the install.sh script. This ensures all dependencies are in place and compiles the project, allowing you to experience the OpenGL ES 2.0 context in action, integrated with SDL2 and Glad.
If you find yourself lost during the process or simply wish to directly clone the template, it's available in the GitHub repository here.
Stay tuned for the next tutorial where we'll delve into building a fractal using OpenGL, shaders, and fragments. It promises to be an exciting mix!
./install.sh
Exercises for the Reader
Using the git submodule command, clone the following vendor libraries:
- glm (OpenGL Mathematics (GLM) is a header only C++ mathematics library for graphics)
- stb (Image loader C language)
These are helpful header-only libraries. A hint for this exercise: you need to modify the HEADERS variable from root CMakeLists.txt